Finding Peace, Comfort and Dessert ...

Wednesday, March 23, 2011

C is for...

Curry and Cheesecake!

I love both of these dishes tremendously. And they both end up being unique creations a la Truffles and Tranquility. ;)

The curry has been a work-in-progress recipe of mine since my Yoga Teacher Training in 2009. For each of my retreat weekends, the other Yoginis and myself made vegetarian dishes to share pot-luck style. I love cauliflower and curry so I went in search of a rich, fragrant recipe that utilized my favorite super food. The original recipe I started with can be found here but I've made quite a few changes and substitutions as you will notice. This dish is completely meat free, and if you substitute out the butter for something like ghee, it can be a vegan dish too! Its packed with nutrient rich foods and life cleansing spices. Enjoy with your favorite home made (or purchased) flat bread or some brown rice and a nice crisp glass of your favorite white wine!

Spinach Cauliflower Curry

This is not a hot dish, its a fragrant dish. Its exquisitely passionate and well flavored. 

Ingredients: 5 small potatoes, peeled and diced
1 onion, finely chopped
1 head of cauliflower, chopped into bite size pieces
1 can coconut milk or coconut cream
1 cup veggie broth
1 tsp Chilli powder
2 tsp yellow mustard seeds
1 tbsp ground Cumin
1 tsp ground Cardamom
2-4 cloves of Garlic, minced
1 tsp ground Ginger
2 tbsp Curry powder
1 tbsp Turmeric 
1-2 cups frozen spinach
2 tbsp butter (or veggie oil, or ghee) for frying
Salt and Pepper to taste. 

Step 1.
In a large, deep frying pan (with a lid) melt the butter and sautee the garlic and onions until they turn clear; 4-5 minutes.

Step 2.
Add in the spices, sauteeing until the seeds crackle and the room is filled with fragrance about 30 seconds - 1 minute. 

Step 3. 
Ok, I did make this particular dish with peas,
I forgot to pick up spinach!
Add in the coconut milk and whisk briskly to dissolve any clumps. Add in the veggie broth. Bring the sauce to a simmer. 

Step 4. 
Add in your fresh veggies, tossing carefully to coat. Cover and let steam on medium-low for 15 minutes (or until tender), stirring occasionally to prevent sticking. When you check it, check the flavorings and add as you feel necessary.

Step 5.
Add in the spinach and cover again. Continue cooking for about 10 minutes.

Step 6.
Remove from heat and let stand for a few minutes to thicken. Serve over flat bread or brown rice!


I'm very excited to bring you an original recipe -- no one to link to here! 
Cardamom Lemon Cheesecake (no bake!)

This delightfully citrusy cheese cake is the perfect compliment for spring! Its cool and creamy, with the bite of lemon. Almost as tart as a key lime pie with a smooth finish. 

Ingredients

Filling:
14 oz softened cream cheese (no, I don't use the low fat kind, but you can!)
1/2 cup granulated sugar
1/3 tsp ground cardamom
1 tsp vanilla
Juice from 1/2 fresh lemon
1/2 cup sour cream

Crust:
1 cup crushed graham crackers
2 tbsp melted butter
3 tbsp granulated sugar

To make the crust:
 
Mix graham crackers, butter and sugar all together until well combined and crumbly. Press firmly into a 7" spring form or pie pan and place in the fridge until the filling is ready. (or you can buy one of those pre-made graham cracker crusts!)


Filling:
Step 1.
Combine all ingredients in the mixer and blend until well combined and creamy. 

Step 2.
Pour over crust and refrigerate for no less than 2 hours. Longer is better!


Top with fresh berries or lemon slices and enjoy this refreshingly simple and delicious cheesecake!


I'm quite proud to bring you some of my own culinary creations, I hope you find them tasty and easy to make!  I made both these dishes for some dinner guests and they were a total hit! 

Wednesday, March 16, 2011

A European dinner...

Thankfully today was less chaotic than yesterday but just as stressful. Looking for a job that utilizes my upcoming bachelor's degree is exhausting! But I gave my first job fair a good run, and even applied for a few jobs. I'll chalk  it up to a great learning experience and keep my hopes up and out there for a job I enjoy ... (Any chance Rachel Ray would show up at my house and want me to co-host? ;) )

Because I knew I was going to have a busy and draining morning I set out an easy slow-cooker beef dish. This recipe is super simple, its something most people have tried. I served my French Onion Soup Beef Roast with freshly made Yorkshire Puddings and peas.

French Onion Soup Beef Roast (Slow Cooker)

I like using the can of French Onion Soup over using a powder for one reason alone. Its less salty. I've made the recipes that call for the package and a dash of water and wine. And tasting that is what I imagine the Dead Sea would taste like -- nothing but salt. So this is my go-to mix for the most tender make-your-house-smell-like-heaven beef roast. 

Ingredients:

1 can Campbell's French Onion Soup
2 cloves of Garlic (minced)
1 Shallot (halved and sliced thin)
2-4 lb beef roast (I always get a round roast, but get your cut of choice!)

Step 1.
Dig out your slow cooker.

Step 2.
Put the beef in the slow cooker, pour the soup over it. Toss in the garlic and top with the shallots. Set on LOW for 6-7 hours!

Step 3.
Enjoy the aroma filling your house and torment those who live with you with a long wait for their delicious beef. =)

Yorkshire Pudding

These could not be any easier. Really! There is a 'special' pan you can use to make them in, you can find it for sale here. I don't have that pan, so I made mine in a muffin tin like the recipe I used. (which can be found in original form here. ) You can also just make the pudding in a large square dish, which is the traditional method of baking them. Here is an example of that.

Ingredients:

3 eggs
1 cup milk
1 cup all-purpose flour
2 Tbsp butter (melted)
1-2 Tbsp of beef drippings *optional*

Step 1.
Preheat the oven to 375. Whip the eggs and milk together until light and frothy.

Step 2. 
Gently combine the flour with the milk/egg mixture. Mix in the butter.

Step 3. 
Let rest on the counter until the oven is done preheating.

Step 4. 
This is where the optional part comes in. Using a well greased tin, you can choose to just pour the batter in, or you can precede the batter by adding a about a teaspoon of beef drippings into the pan before pouring the batter. 

Step 5.
Bake at 375 for 5 minutes. Then turn the oven down to 350 and bake for an additional 20-25 minutes or until golden and fluffy. They will collapse in the center when you remove them to let them cool. 

Step 3.
Serve alongside your beef roast for a very tasty and culturally diverse dish! ;)


 Happy Wednesday!

Tuesday, March 15, 2011

Hunter's Chicken and a botched cookie attempt.

So today was a bit of a disaster for me ... First, I ran around like crazy for 2 hours this morning thinking it was Wednesday. I hurried to grab a shower and be presentable to the other wives I was going to meet for a play-date at 1030. THEN I had to come up with a dish to bring to the play-date because it was potluck. I decided on these mini sandwich cookies because I had all the ingredients on hand. *In hindsight, I should have gone with my first idea - a new twist on a staple of mine: 7-layer dip. This recipe called for fresh Pico de Gallo and avocados... I'll have to share that one later...*

My first mistake was attempting to make a new recipe right before I needed to be somewhere. My second mistake was attempting to BAKE something in the hour before I needed to be somewhere. My third mistake of the morning was baking for the FIRST TIME with a gas oven the day of an event that required my attendance. So, I ended up shooting the hostess a Facebook message telling her we would be late, burned my first batch of the cookies, and almost cried because of my poor planning. Then the hostess wrote me back: the play-date is tomorrow. 

I heaved a humongous sigh of relief. I hadn't potentially ruined a first impression! ... Then I laughed at myself for freaking out when it was the wrong day. Then I told DH that he needs to go back to work so my sense of time gets back on track. Then we went to Lowe's and I pondered fixes for my cookie sandwiches. And things went smoothly for the rest of my Tuesday.

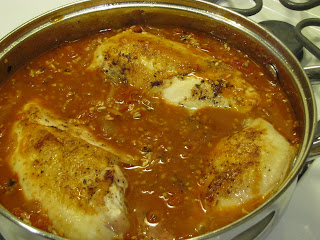
Tonight's dinner is a new recipe, brought to you by my new booklet America's Best Lost Recipes. Its a one-pan dish from stove top to oven, and I love these kinds of dishes. Its not for a non-meat eater, though. Its chicken, the second most garlic I've seen in a recipe and bacon. The only recipe I've seen so far with more chicken is Chicken with 40 Cloves and I've yet to attempt it.

Ok, time to dive in!

Hunter's Chicken

Ingredients:

1.5 lbs Split Chicken Breasts
4-5 slices of Bacon (chopped)
20 cloves of Garlic (minced or sliced thin)
2 Tbsp Sweet Paprika
5 Shallots (halved and sliced thin)
1 Tbsp Tomato Paste
1 can diced Tomatoes (the original recipe calls for 3 fresh tomatoes, diced and cored .. but I didn't have any)
2.5 cups Chicken Stock
1.5 cups Long Grain Rice
2 Bay Leaves
2 Tbsp fresh Lemon Juice
Salt and Pepper

Step 1.
In a large oven safe skillet, cook the bacon until crispy. Set it aside on a paper towel. Preheat the oven to 375.

Step 2.
Pat the chicken dry and season the way you like. Using the same skillet as the bacon, with all that deliciousness in it, cook the chicken 5 minutes on each side, or until golden brown.  Set the chicken aside on a  plate to rest.

Step 3.
Toss in the shallots and saute for a few minutes, until tender. Then add in the garlic and paprika, sauteeing until fragrant.

Step 4.
Add the tomato paste to the shallots and garlic, then add in the diced tomatoes. Simmer until the juices have evaporated, about 2 minutes.

Step 5.
Add the stock, lemon juice, rice and bay leaves and bring to a simmer.

Step 6.
Nestle the chicken into the skillet. Bring back up to a simmer, then place the skillet in the oven.

Step 7.
Bake for 40-45 minutes, until the chicken is done and the rice is tender. Let the dish rest and cool for 5 minutes, then sprinkle that bacon on top and serve!


Personally, I thought this dish could use a little spice. Maybe a dash of red pepper flakes, or trading out the sweet paprika for hot. A sprinkling of fresh herbs would be a lovely addition too -- some basil would add a little pizazz. But made as is, the chicken is very tender, the dish is very fragrant and even my toddler ate it! It's definitely a comforting dish! 


I did get the chance to re-try the mini sandwich cookies, and I was successful. I did run out of time tonight to complete the process, so I will share that recipe with you tomorrow! I am thankful I got it right the second time around!

I hope everyone else had a great Tuesday! ;) <3 

Sunday, March 13, 2011

Welcome to my Maryland Kitchen!

Hello dear friends! We have finally settled in enough, and have enough unpacked for me to start sharing recipes again! I'm so excited to be cooking again, it makes me feel so awesome. Being up here is nice albeit busy. Congratulations are in order to my little Sister and the arrival of her second child Autumn Belle. She graced us on March 7th, 2011 and she is just as gorgeous as her momma and her big sister! I am one blessed Auntie!

But now for the good stuff-- THE FOOD! I got a new cookbook from America's Test Kitchen  and I.love.it! I love every book I've come across from them, I'm so grateful to Val for introducing me! The Cookbook is called America's Best Lost Recipes and you can buy it here from Amazon. I actually just got a little booklet in with my Best Potluck Recipes Cook's Country sent me this month. Of the two recipes I'm going to share today, the first is from the Lost Recipes and the second is from the Potluck book. I hope you enjoy!

Black and White Chicken Chili

Since it has been a lot colder than we are used to, I have been really wanting a simple but hearty chili. This is made with meat but you can easily make this a meat free dish by substituting the chicken/broth with veggie broth and tofu or mushroom stock and baby bellas. It is a brothy chili, if you like yours thick, cut the broth by a cup.

Ingredients:

1 1/2 pounds boneless, skinless chicken breasts, trimmed
Salt and pepper
2 tablespoons olive oil
1 onion chopped fine
4 garlic cloves, minced
1 1/2 teaspoons ground cumin
1 1/2 teaspoons dried oregano
4 cups low-sodium chicken broth
1 can cannellini beans, drained and rinsed (Northern Beans or Navy Beans are good substitutes for Cannellinis, as they can be difficult to find)
1 can black beans, drained and rinsed
1 1/2 cups frozen corn, thawed
1 small can chopped green chilies
1/4 cup chopped fresh cilantro

Step 1.
 Pat the chicken dry with paper towels and season with some salt and pepper. Heat 1 tablespoon of the oil in a Dutch oven (or heavy bottomed stock pot) over medium-high heat until just smoking. Cook the chicken until its golden brown on both sides, about 5 minutes, flipping halfway through. Take the chicken out and let it rest on a plate.
** As a note, I only use sea salt in my cooking. I also use the fresh grinders for my pepper.. I love them and they come in many flavors!**

Step 2.
Heat the remaining oil in the pot over medium-low heat until simmering. Add the onion and a pinch of salt and cook, stirring occasionally, until softened, 5 to 7 minutes. Add in the garlic, cumin, oregano, and a dash of pepper and cook until fragrant, about 30 seconds. Stir in the broth, scraping up any browned bits from the bottom.

Step 3. 
Add the chicken and any juices on the plate back into the pot and simmer (covered) for 10-15 minutes or until the chicken is cooked through.

Step 4.
Remove the chicken and allow it to cool. While it is cooling, add in the beans, corn and green chilies. Then shred the chicken into bite size pieces. Add that back to the pot and simmer for 10 minutes or so. 

Step 5. 
Serve topped with some freshly chopped cilantro! And enjoy!


Cheddar Cheese Ball with Parsley and Chives

This was my first ever cheese ball hors d'oeuvres made for my first Meet and Greet with some really wonderful ladies I met through Facebook here at Fort Meade.  It was SO EASY -- took about 5 minutes to whip together and about 2 hours to rest in the fridge. The original recipe calls for mayonnaise (which I left out... just as an oversight on my part but I left it out of the recipe below as well) and cayenne pepper. I didn't have any cayenne, so my substitution is below. 

Ingredients:

1 8oz package of cream cheese (softened) (and no, I didn't use the low fat variety, but you could!)
2 cups shredded extra sharp cheddar cheese
2 teaspoons Worcestershire sauce
a couple of cloves of garlic, minced
a pinch of chipotle smoked pepper
Freshly chopped herbs of your choice. I chose parsley and chives to cover my cheese ball in.. but you could use any others you enjoy or go for some toasted almonds. 

Step 1.
Put all of the ingredients minus the fresh herbs into a food processor.

Step 2.
Pulse blend the mixture together until it is smooth, about a minute. 

Step 3. 
Spoon the mixture on to a big piece of plastic wrap. Wrap up the ball forming it slightly and twisting the top. 

Step 4.
Stick it in the fridge for at least 2 hours but no more than 2 days.

Step 5. 
When its firm, take it out, and smooth out the ball. Remove the plastic. Cover with your fresh herbs, pressing gently to get them to stick. 

Step 6.
Let the cheese ball sit out for a few minutes to soften slightly (especially if its been in the fridge for more than 2 hours) and serve with your favorite crackers!


I sure hope you have enjoyed my first selections from my new kitchen! Many many more to come! <3<3